I had another great game of Starship Troopers on Wednesday. (I really need to bring a camera.) This time I was playing the bugs and I had to defend some Plasma bugs. It was a pretty tough scenario. The 3 plasma bugs were not part of my points total but the MI got to start within the Plasma's minimum range. The MI objective was to destroy those 3 bugs. The bugs had to stop them (by killing all the MI.)
The game started out with MI Pathfinders coming out of hiding and shooting at one of my Plasmas. The MI doing 5 wounds with the Morita rifle drove home how vulnerable the Plasmas are. After two other groups MI were able to drop into within my Plasmas minimum range, I thought, “This is going to be a short game.” On my turn, I moved my wounded Plasma toward the Pathfinders, my two other Plasmas as far away from the enemy as possible, my tanker towards the dropped MI and I unleashed my defender force – 24 hopper bugs.
The next MI turn saw 4 Chicken Hawks, 2 Apes, and a Squad of MI disembark from their transports. They took some potshots where possible and wound some more plasma bugs. The Pathfinders also took some shots at the 1st Plasma bug and wounded it some more. Unluckily for them, they did not kill the Plasma and since they were within 10 inches, it got to react. Now when you react in ST, you have to focus on the unit causing the reaction. If not, this Plasma had moved far enough to shot at MI on the other side of the board. But it could not, so it charged the MI and killed two of them. The Pathfinders now had their second action and they had to kill the Plasma. If they did not, it could do serious hurt to the MI on the far side of the board. Plus, there were hopper bugs bearing down on them – enough to finish off the MI this turn. If the Pathfinders died before taking out the Plasma, it had a good chance of lasting the rest of the game. I’m stressing that as the MI decided they need to pour everything they had into the Plasma. By doing so they risked the Plasma bugs retaliate if they got an outright kill. Well, they did get an outright kill and the Plasma bug exploded taking 3 MI with it.
For the bugs turn, the two remaining Plasmas move further from the MI, the Tanker moved towards the MI and got off an ineffective spit, and the Hoppers went into action. Normally, when I play Starship Troopers I try and focus as much of my force on one part of the enemy as possible. That way I get the maximum amount of attacks possible while minimizing the number of attacks the enemy gets. For this scenario I couldn’t do that. I needed to engage every MI unit possible. This would then either force the MI to deal with my Hoppers, or if they didn’t, let my Hoppers get free reaction attacks on the MI. So with that plan, one group of Hoppers did their fly by attack and finished off the pathfinders. One group of Hoppers hit the standard MI and killed a couple. And one group of hoppers moved to attack two units of Apes and Chicken Hawks, killing one. The last group couldn’t reach any MI but positioned itself to react against a unit of Apes and Chicken Hawks.
The next MI turn was one of action and reaction by the Bugs. It ended with some dead hoppers, a wounded tanker, some dead MI, and more wounds on the Plasma Bugs. The Bug turn saw another ineffectual Tanker spit attack, some more standard MI kills, and a Plasma Bug attack. This was big it took out another Chicken Hawk which was the biggest threat to the Plasma Bugs.
The last turned ended up being close. The MI continued to focus on the Plasma Bugs. They finished off one more and brought the last one down to 1 wound. But the reactions by the Hoppers killed one Chicken Hawk, brought the standard MI down to 2 models, and allowed the tanker to move within ‘charge’ range of an Ape and a Chicken Hawk.
For the bug turn, they needed to finish off the MI. If not, they would most likely get that last wound on the Plasma Bug and win the game. The turn started with the Tanker bug charging the Ape and killing it. The Chicken Hawk reacted and brought the tanker down to its last wound. The tanker then charged the Chicken Hawk and killed it. Next, one group of Hoppers moved in to finish off the last Chicken Hawk. This left 9 Hoppers to finish off the last two standard MI, which they did.
This was a pretty fun game and everyone had a blast. The outcome was by no means certain and was well played by all parties. We forgot some rules, such as the command for the MI, but overall we had getting a good grasp of the rules.
Friday, November 12, 2010
Monday, November 1, 2010
Aeronef Halloween Scenario
Here is a simple little scenario for Aeronef in the spirit of Halloween.
Background and Victory:
An alliance of nations has tracked down a rogue Austro-Hungarian battleship The Nosferatu. The alliance has caught up with it just before it reached its home port. The alliance player needs to destroy the Nosferatu without losing a non-US ship. The A.H. player needs to keep the Nosferatu afloat to win. Any other result is a draw. When the Nosfertu is destroyed, the rest of the Austro-Hungarian forces surrender.
Alliance Forces:
Texas class Battleship USS Quincy Morris
De Ruyter class Heavy cruiser HNLMS Van Helsing
Benbow class Battleship HMS Jonathan Harker
Audacious class Battlecruiser HMS John Seward
Exeter class Cruiser HMS Arthur Holmwood
Austro_Hungarian Forces:
Szent István class Battleship The Nosferatu
5x Huszár class Destroyer Gypsy Destroyers
Raevski class Aerial Redoubt Dracula's Castle
Setup and Special Rules:
A 4x4 board should be sufficient and set up like a remote area of the Carpathian Mountains. Dracula’s castle should be located on a center line 6 inches from the eastern edge. One Huszar destroy should be placed with it. The Nosferatu should be placed 12 inches from western edge along the same center line. The USS Quincy Morris may be placed anywhere on the western table edge. The rest of ships move onto the board on turn 2. That placement is the movement for those ships. The Alliance forces start anywhere on the western edge. 2 of the Huszar destroyers may be placed anywhere on the northern edge and the other 2 may be place anywhere on the southern edge. The Austro-Hungarian ships may not move off the edge of the board. All other ships may but are removed from play. They are not considered destroyed if they do so.

Notes:
This scenario is based on the climax of Dracula with each ‘Nef being a character from that scene. It was somewhat of a struggle to come up with good mix of ships for the Alliance. I started with having the USS Quincy Morris be a Texas class battleship as Quincy Morris was from Texas in the book. Also, I put in the Aerial Redoubt as Dracula’s castle for the reason that, as Dracula’s castle is a place of power for him in the book, it should be so for him the scenario as well.
Background and Victory:
An alliance of nations has tracked down a rogue Austro-Hungarian battleship The Nosferatu. The alliance has caught up with it just before it reached its home port. The alliance player needs to destroy the Nosferatu without losing a non-US ship. The A.H. player needs to keep the Nosferatu afloat to win. Any other result is a draw. When the Nosfertu is destroyed, the rest of the Austro-Hungarian forces surrender.
Alliance Forces:
Texas class Battleship USS Quincy Morris
De Ruyter class Heavy cruiser HNLMS Van Helsing
Benbow class Battleship HMS Jonathan Harker
Audacious class Battlecruiser HMS John Seward
Exeter class Cruiser HMS Arthur Holmwood
Austro_Hungarian Forces:
Szent István class Battleship The Nosferatu
5x Huszár class Destroyer Gypsy Destroyers
Raevski class Aerial Redoubt Dracula's Castle
Setup and Special Rules:
A 4x4 board should be sufficient and set up like a remote area of the Carpathian Mountains. Dracula’s castle should be located on a center line 6 inches from the eastern edge. One Huszar destroy should be placed with it. The Nosferatu should be placed 12 inches from western edge along the same center line. The USS Quincy Morris may be placed anywhere on the western table edge. The rest of ships move onto the board on turn 2. That placement is the movement for those ships. The Alliance forces start anywhere on the western edge. 2 of the Huszar destroyers may be placed anywhere on the northern edge and the other 2 may be place anywhere on the southern edge. The Austro-Hungarian ships may not move off the edge of the board. All other ships may but are removed from play. They are not considered destroyed if they do so.

This scenario is based on the climax of Dracula with each ‘Nef being a character from that scene. It was somewhat of a struggle to come up with good mix of ships for the Alliance. I started with having the USS Quincy Morris be a Texas class battleship as Quincy Morris was from Texas in the book. Also, I put in the Aerial Redoubt as Dracula’s castle for the reason that, as Dracula’s castle is a place of power for him in the book, it should be so for him the scenario as well.
Wednesday, October 20, 2010
More Gaming
Not much of an update, but I got in three games this past week. A week ago Wednesday I got in a good game of Starship Troopers. It was Priority Level One which means 1000pts per side and limited troop selections. I had two squads of MI, a Chickenhawk, and an Ape. I faced two swarms of warrior bugs, some hoppers, and a tanker bug. We played on a table left over from a 40k game. It looked nice and was filled with terrain – too much most likely. There was a chemical river running down the middle which proved to be the bug’s downfall. The bugs were funneled to the river crossings which slowed them down and gave me points to concentrate fire. As such, the biggest threats to me were the hoppers and tanker bug. With the hoppers being the faster and more flexible of the two, I concentrated on them first. After taking them out, I worked on killing bugs until the tanker became a threat. At which point I took it out.
On Saturday I had the privilege of playing in a 28mm pirate game called, “Queen Anne's War, A Pirates Paradise.” This game was run by John Cusack and it was awesome on every level - beautifully painted miniatures, gorgeous terrain, and great scenario design. John will be helping run more of this game at Rock-con as part of the Battlefield Hobbies team. If you are at the con, seek these games out. Year in and year out, the Battlefield Hobbies’ games are normally the best of show.
Lastly, I got in a game of the new Ravenloft board game. It is a co-op game and it is quite fun. The figures that come with it are very much like the Descent figures. They are nicely detailed for board game plastics. The game itself seems well designed and easy to pick up. And scenarios seem well balanced. We ended up losing our first game but had we lasted one more turn, we would have won. I’ll be playing this more in the near future and will have additional comments afterwards.
Friday, October 1, 2010
Some 28mm Sci-Fi Comparisons
While waiting to get my hands on AE-Bounty (another article) I’ve been building up my collection of non-GW 28mm Sci-Fi figures. My current purchases are an eclectic collection with figures from Regiment Games, Four A Miniatures, Darkson Designs, Pig Iron Productions, and Zombie Smith (links at end of article). All the figures are top notch. They all required minimal cleaning, have a nice dynamic about their sculpting, and are well proportioned. I would recommend them to anyone.
Below is a picture I took comparing a selection of miniatures from the above ranges. Now I realize the usefulness of such a picture is limited. Even among humans we have a wide variety sizes and once we toss in the alien and mutant, things get even further eschew. Couple that with the fact these figures will mostly be used in skirmish or squad level games, who cares how well they scale together? It is not like we are comparing ancient Romans for a legion – a group of people most likely from the same region and fairly homogenous. Still, there is some intangible use for such a picture. It shows these figure do feel ‘right’ when used together.

Below is a picture I took comparing a selection of miniatures from the above ranges. Now I realize the usefulness of such a picture is limited. Even among humans we have a wide variety sizes and once we toss in the alien and mutant, things get even further eschew. Couple that with the fact these figures will mostly be used in skirmish or squad level games, who cares how well they scale together? It is not like we are comparing ancient Romans for a legion – a group of people most likely from the same region and fairly homogenous. Still, there is some intangible use for such a picture. It shows these figure do feel ‘right’ when used together.

The measurement scale was placed to start at the top of the base. Each figure's base is practically the same height. The only problem, both the Pig Iron and Regiment Games figures have cast on bases. The thicker bases on the Regiment games figures slightly skew the comparison, but isn’t that big a deal. The Pig Iron base is relativity thin and is almost no factor at all.
Darkson Designs: http://darksondesigns.com/?page_id=135
Four A Miniatures: http://www.fouraminiatures.com/
Pig Iron: http://www.pig-iron-productions.com/
Regiment Games: http://regimentgames.com/
Thursday, September 30, 2010
I finally got a game in last night.
And it was Starship Troopers. I forgot how much I like those rules. There are some issues with them, but over all they are a fun set. We decided we each need to go back and read them a bit more. It was quite some time since any of us played them. Towards the end, there was a good bit of rumbling about how fun it was and we need to play more. So, I’ll be pushing for a game in two weeks. There was even a mention of playing a campaign. That will be fun if it happens. When it comes to gamers, the mantra, “We need to play more,” is not always followed by actually playing more. (I’m as guilty as anyone.)
I’ve got a good number of Starship Troopers figures painted. Maybe I can get some pictures taken. I also found a box full of primed stuff. So I hopefully can get some painting in. Since I've moved house, I just haven't had time. Also, I should take the opportunity to get some paint on my Junk Town. That terrain will work well for Starship Troopers.
I’ve got a good number of Starship Troopers figures painted. Maybe I can get some pictures taken. I also found a box full of primed stuff. So I hopefully can get some painting in. Since I've moved house, I just haven't had time. Also, I should take the opportunity to get some paint on my Junk Town. That terrain will work well for Starship Troopers.
Thursday, July 29, 2010
State of my Hobby
Well,
We just closed on selling our house and have moved in to the new home. The whole process of moving house has been going on for quite some time. My time had been divided up into fixing the new house, fixing the old house, packing, and moving.
Now, I just need to continue to fix up the new house and unpack. Then I can tackle my wall of shame – hell, barn of shame - and sort through my entire lot of mixed up hobby stuff. I actually had a system at the old place and knew where everything was. I do not know anymore.
The fact that I can fill up an old tobacco barn with my hobby stuff is quite absurd. Granted, the boxes are not packed well, only half the stuff in the barn is mine, half of it is books and it only is over my head in a few places means it isn’t as bad as it sounds (yes it is.)
So, as soon as I can dig out my hobby workbench, I will post some project progress. Maybe a picture of the Barn of Shame would be good for posterity’s sake.
Friday, May 28, 2010
Junk Town 4 - More Odds and Ends
Here are some quick images of some additional Junk Town terrain pieces.


Friday, May 7, 2010
Junk Town Part 3 - Odds and Ends
Well, I figured I need something besides buildings for my junk town. So, I spent this lunch period throwing some odds and ends together. A couple of bigger pieces are meant to hold figures while the other pieces are just for show.

This is the whole lot together.

Here an entrepreneurial alien has taken advantage of the space ports blast exhaust to cook the food he sells. It tastes just like gyros but don’t ask about ‘meat.’

Is that the Orb from Heavy Metal?

Random Stuff

Solar powered street lights for Junk Town.
Wednesday, May 5, 2010
Junk Town Part 2 - 2 Multi-Stall Market Buildings
I was able to finish off two of the larger buildings I had going yesterday at lunch. This was mostly thanks to this blog entry here: http://weeblokes.blogspot.com/search/label/Lunch-time%20Project . After reading that, I realized that most of the progress I had made in the last couple of months was actually done at lunch. And now I had stopped even do that. So yesterday I finished up what you see below:


As is, I can fill up a 4x4 section of table top that is useful for a game. That means it is not nearly as crowed as a real shanty town but has enough open spaces to move figures around. Plus it will allow a wargamer's sausage fingers in as well. Next up will be modular space-bar. It will be rather larger to allow for combats inside. That will be followed by the Market Authority Building. The MAB building will have a more substantial look to it but still be ‘junky.’ I hope to follow that up with some smaller buildings that match the style of the above pictured market stalls. And, if I am still motivated I have ‘junk’ set aside for housing blocks on the table’s edges, a last market stall built into the engine wreckage, and small detail piles of junk.
Once everything is build, I will start painting.


Now I ended up mixing in some non-junk for the roofs on these. I had some textured plasti-card laying about for an old project that wasn't being used. Of course, it is still mostly build from scrape pieces of foam-core, broken up floppy disks, and cardboard. So they are still mostly pieces of junk.
As is, I can fill up a 4x4 section of table top that is useful for a game. That means it is not nearly as crowed as a real shanty town but has enough open spaces to move figures around. Plus it will allow a wargamer's sausage fingers in as well. Next up will be modular space-bar. It will be rather larger to allow for combats inside. That will be followed by the Market Authority Building. The MAB building will have a more substantial look to it but still be ‘junky.’ I hope to follow that up with some smaller buildings that match the style of the above pictured market stalls. And, if I am still motivated I have ‘junk’ set aside for housing blocks on the table’s edges, a last market stall built into the engine wreckage, and small detail piles of junk.
Once everything is build, I will start painting.
Saturday, April 10, 2010
Attack on Bree
Not really a canon battle, but here are some pictures of the setup for an attack on Bree. It gives me a reason to put some two level Tudor style houses with my hobbit houses. The story line goes as such; Some elves heading west to leave Middle Earth discover some wandering orcs and a Troll heading towards Bree. The elves decide to intercept them on the outskirts of one of the outlying settlements near Bree.


The Approach towards town.

Orcs pour over bridge.

View of Battle from Town.

Shouldn't that troll be in Mordor?

Elves await orcs.

Customized GW trees.

GW Hill.

GW multi-part hill.

GW multi-part hill and GF9 river.

Customized MBA hobbit house.
Friday, April 9, 2010
GW War of the Ring: Battlehosts

I got a chance to look at War of the Ring: Battlehosts. It is a nice expansion for War of the Ring though I didn’t see if it addressed some of the issues people have with WotR. I don’t think it does, but I may have missed it.
What it does do is give you special formations (or battle hosts) made up of specific formations and characters from WotR. By building them this way and playing an extra cost for the special formation the player gets access to special rules for that formation. Additionally, there are more Fortunes and Fates one may purchase for their force.
Each of the factions from WotR has some battle hosts associated with them. Some have more than others. Here are some numbers
Gondor: 9
Rohan: 4
Elven Kingdoms: 4
Dwarf Holds: 2
Forgotten Kingdoms: 2
Mordor: 9
Isendgard: 6
Misty Mountains: 2
Fallen Realms: 8
Angmar: 3
Not having played with any of these formations yet, I will not comment on their effectiveness. But they seem to be fun and nicely themed. I also think they make a nice guide for collecting the figures even if you don’t put them on the table as a Battlehost.
As always, the book is filled with great pictures and I find myself getting motivated to paint up some more LotR figures. People who do not play WotR may not find this book all that useful, but those that do will find it a nice little product.

GW Knights of Dol Amroth and Morgul Knights
I was able to check out each of these new plastic figures. They are quite grand. They have nice detail and minimal mold lines, plus they go together quite well. Here is a picture of them on the sprue.


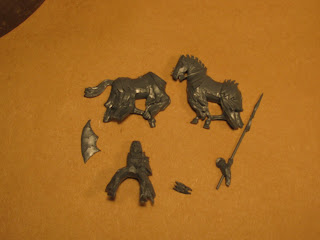
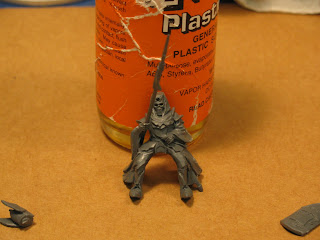
Without the face plate, the Morgul Knights would make great undead knights in 25mms. One would just need to fill in the hole for the face plate. See a closeup below.


Knights of Dol Amroth
Morgul Knights
Here are some shots of the figures removed from the sprue.
Knight of Dol Amroth
Morgul Knight
Lastly I will show each of the knights put together.
Knight of Dol Amroth
Morgul Knight
Thursday, April 1, 2010
Forge World Adeptus Mechanicus Army

Here are some figures from Forge World's new Adeptus Mechanicus army.
Friday, March 19, 2010
Some Quick Lord of the Rings pictures
Here are some pictures of my elves and my many more Orcs. Not that I painted any of them....


Some Last Alliance of Elves and Men Elves defending against an onslaught of Orcs.


Close up of the Orcs.
Friday, March 5, 2010


Update - Junk Town and NKE
I've been busy painting up figures for my Dark Heresy campaign as well as being out of town so I haven't had a chance for an update. Hopefully this weekend I will take some pictures of the miniatures that have appeared so far.
Junk Town
As I said in a previous Junk Town log, I need to make some bigger buildings. Well, I've got some bigger buildings in the works and maybe get some pictures of those today. I have two sets of connected market stalls in the works, plus a row of housing, a large modular bar, and a tower building. The row of housing is intended a table side while the tower building is a multistory building that would could be used as a security station for police or maybe some kind of market authority.
I’ve been holding off on painting structures I’ve already built as I plan on adding additional detail to them. And I need to find items for that. Detail is needed to make any building look good. Even sterile buildings of the Tau and Eldar benefit from detail – small things that tell the viewer someone uses these. I think the key to having ramshackle buildings look well is an overload of detail - things that show the hard use, quick fixes, and lack of planning. Plus the owner of a ramshackle building most likely would find value in things otherwise would just toss. So having a collection of stuff in and around the ramshackle building would also add to the look of the building.
In addition to buildings, I will have some permanent denizens of the Junk Town. These are miniatures in my collection for which I have no other use. Things I failed to sell. Currently they are ugly monsters from the 80’s TSR miniatures line. I may put some on bases to move around, but most will be store keepers and what not that will be attached to a building.
NKE
I finally found the spears for these guys and now I need to find my pine-vise. In the meantime, I have cleaned up some archers and I have primed them. I will painted these in the same manner as my spearmen.
Monday, February 8, 2010
Painting an Egyptian Part 2
After leaving off with Part 1, I still had weapons, shields, head gear, and bases to finish. Well, some sneaky Hittites must have stolen all my spears. (I can't find them, hopefully they are in my Hittite box) Still, I was able to finish the shields and head gear so I will stick the spears in part 3.
Step 1a: Shields Back
To make life easier I normally paint the backs of the shields before I put them on. For this I used GW Bestial Brown. When dry, I inked it with GW Devlan Mud.
Step 1b: Shields Front
For these shields I decide to go with a cow hide pattern. I used brown for this batch as I didn't have any black ink. There were more phases to painting the shields then any other single item for these Egyptians. Painting time for each of the phases was fairly quick though some extra time was needed for some of the phases to dry. The images go from left to right.


These guys are almosted finished. I just need to attach and paint the spears, put on the basing material and spray the protective coat. I will cover that in part 3.
Acknowledgements:
My friend Chad came up with this cow hide technique though I adapted it a bit for my own style.
Step 1a: Shields Back
To make life easier I normally paint the backs of the shields before I put them on. For this I used GW Bestial Brown. When dry, I inked it with GW Devlan Mud.
Step 1b: Shields Front
For these shields I decide to go with a cow hide pattern. I used brown for this batch as I didn't have any black ink. There were more phases to painting the shields then any other single item for these Egyptians. Painting time for each of the phases was fairly quick though some extra time was needed for some of the phases to dry. The images go from left to right.

Stages of Shields
- Base coat shield with Vallejo Bonewhite. (5 minutes)
- Dab Devlan Mud for cow spots. (2 minutes)
- When dry, dab Bestial brown over ink spots. Leave a bit on ink uncovered by brown. (2 minutes)
- Dab Reaper Woodland brown in middle of ink spots. Then quickly go back over cow spots with Devlan Mud. Use it to blend browns. (5 minutes)
- Prepare brush for a dry-brush of white. Then dab white over cream areas. (3 minutes)
- Paint boss in middle of shield black. ( 2 minutes)
- Paint bronze over black, leave a bit of black for black lining. (2 minutes)
Step 2: Head Gear

Highlight and Head Gear
Next to do was the head gear. But before I could do that I needed to do the final highlight on the linen. The images go from left to right.
- Figure from last step.
- Highlight the linen with white. (4 minutes)
- Paint red stripes on head gear with a brick red. (9 minutes)

Shields and Head Gear Finished
Part 2 Wrap-up:
These guys are almosted finished. I just need to attach and paint the spears, put on the basing material and spray the protective coat. I will cover that in part 3.
Acknowledgements:
My friend Chad came up with this cow hide technique though I adapted it a bit for my own style.
Friday, February 5, 2010
Painting an Egyptian Part I
Right now I'm in the middle of a big project involving ancients and currently I am painting up Old Glory New Kingdom Egyptians. After I read a post on the TMP about mass painting ancients I wondered exactly how fast (or slow) my method was going to be. So I decided to time myself. Now I’ve not bothering to time priming, basing, assembly, or protective coating. But I will time painting. I’m not being overly accurate here. I look at the clock when I start and finish for 10 figures.
Now to make this actually a useful posting and give me a reference if I ever have to duplicate this effort in a year or so, I will include a list of the paints I used and the steps I took.
Step 1: Priming


Step 3: Flesh


Now to make this actually a useful posting and give me a reference if I ever have to duplicate this effort in a year or so, I will include a list of the paints I used and the steps I took.
Step 1: Priming

Primed white with Krylon white primer
Step 2: Linen

Linen painted with Graveyard Earth
Normally I paint 'inside' to out. I start on the flesh and work my way to the weapons. But here, since I was going to be using dry brushing on the linen only, that is where I started. Basically I did the messy bit first.

Stages of Linen
Moving from left to Right:
- I base coated the linen with GW Graveyard Earth. (15 minutes)
- I dry-brush the line with an off-white. Here I use Vallejo Bone White.
- (5 minutes)After letting that dry (time not counted), I ink the linen with GW Devlan mud. (5 minutes)
- After letting the ink dry (time not counted), I dry-brush the linen again with the bone mixed with white. ( 5 minutes)
Step 3: Flesh

Moving from left to right:
- From last step.
- I base coat the flesh with GW Tallarn Flesh. (18 minutes)
- After letting that dry (time not counted), I ink the linen with GW Devlan mud. (4 minutes)
- After letting the ink dry (time not counted), I highlight the flesh again with Tallarn Flesh. ( 8 minutes)

Flesh Finished.
Part 1 Wrap-up:
Not bad progress for one hour. Of course, I can't sit for an hour straight painting. I have to get up and move around. So that makes this a day project. In the next part, I will paint the weapons, shields, and head gear. And I hope to finish up in part 3 with basing and protective coating for the whole unit. This will include the previous 10 I had painted up.
Acknowledgements:
The painting scheme used here is based on one from my friend Adam. It is the scheme he used to paint my Hebrews for me minus an extra flesh highlight. I skipped that highlight to make my Egyptians a shade darker then my Hebrews. The Hebrews Adam painted can be seen elsewhere in this blog.
Subscribe to:
Posts (Atom)